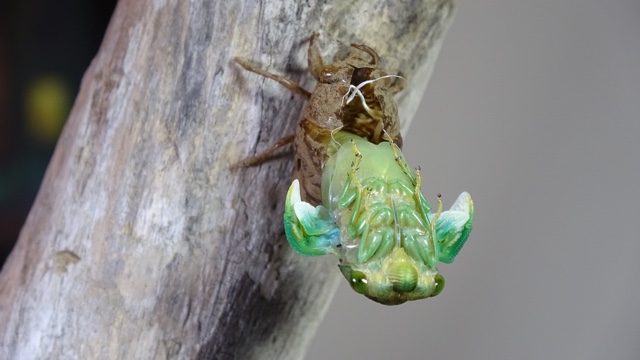
Time-lapse videos of insects molting can be as visually fascinating as they are scientifically important. Cicadas are amongst the best insect subjects for time-lapse because they’re relatively large, and depending on where you live, easy to find.
Equipment you’ll need for your time-lapse video:
- Lights. I use cheap LED and fluorescent lights. Not enough light and you’ll end up with a grainy video. Too much light and you’ll over-expose the subject and miss some important details. You’ll need a stand or tripod for your lights as well.
- A tripod for your camera. You want your camera to be as steady as possible. Hand-holding the camera is not recommended. The molting process takes hours.
- A camera. Some cameras have a Time-Lapse mode, but you could also take a photo every 30 seconds or so and use software to assemble the photos into a video. A camera with a large view screen is recommended so you can make adjustments to the lighting and framing of the insect.
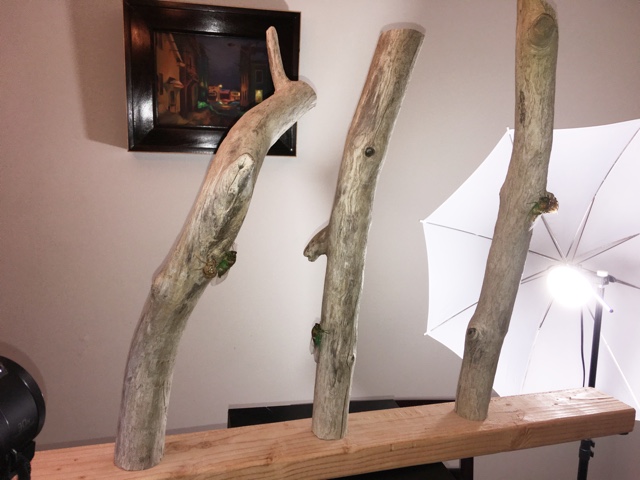
- A platform for your cicada/insect. If you film outside use the tree the insect decides to molt on. If you film inside, build a structure using tree branches, or other materials the nymph can anchor onto.
- Video editing software. Free software works fine, as long as it lets you compile a series of photos into a single video.
I made my own platform out of some driftwood and a 2×4 I had lying around. Cheap but effective. Cicadas need to hang perpendicular to the ground so their wings will properly expand, so your creation needs to allow for that. A lot of people simply use a roll of paper towel.

Skills you’ll need to practice
- Patience. Unless you’re a pro who films wildlife all the time, you might need a few tries to get it right.
- Learn how to use the Time-Lapse feature of your camera.
- Learn how to light a small subject like a cicada.
- The ability to stay up late. The entire molting process can take up to 5-6 hours, especially if you want to let the cicada’s wings and body harden a bit. Coffee or tea helps (you, not the cicada).
If you’ve never tried filming a cicada molting before, you can practice lighting, focusing and using the time-lapse features of your camera with a paper model of a cicada. Just draw a cicada onto a small piece of paper, and pin it to a tree. If you know origami, even better.
Finding a specimen
I begin looking for cicada nymphs about 15 minutes after sunset. I find them at the base of trees, or ascending tree trunks. If you plan on filming indoors, or on a custom platform, treat the cicada with care. Be very gentle, and place the cicada nymph in a spacious enclosure — preferably one that allows it to grip, and hang off the side. I transport cicadas in a pop-up butterfly pavilion/habitat — these portable enclosures are made for butterflies, but they work well for other insects, like cicadas. Don’t forget to release the cicada the following day as well.
The overall process for shooting indoors
- Set up your rig: platform, lights, camera. Make sure your camera has an empty memory card in it and is charged/plugged in. Make sure all the lights are working. Place a towel or something soft at the base of the platform, in case the cicada falls (it happens).
- Collect your specimen. Bring a flashlight and a butterfly pavilion (or similar container). Gently grab the cicada nymph with your fingers and place in the container. do not collect a cicada that has already begun molting. Take some (not a lot) of tree branches with you. You can use the branches to augment your platform.
- Place the cicada at the base of the platform. Let it explore and become comfortable. Place it back at the base of the platform if it falls or wanders off.
- Once the cicada is ready to molt, it will stay still for a while. This is a good time to get your camera in focus and lights in the right position.
- The skin of the back of the nymph will split — look and listen for that. Start time-lapse filming. Example.
- Re-frame the camera as necessary to capture the cicada’s wings as they inflate.
- An hour after the cicada’s wings move into place (see that happen), you can stop filming, and place the cicada into the safety of the butterfly pavilion — or on a tree outside.
- Return the cicada to the outdoors within 12 hours.
- Use video editing software to compile the time-lapse frames into a video. I set each frame to 0.2 seconds — experiment with the times.
- Add the species of the cicada, the location where you found it, and other comments to the video.
- Share your video with friends, family and the world.
More tips:
- The process takes a long time — you might be up until 1 or 2 am in the morning. Be prepared for that.
- Film some non-time-lapse video as well. There are key moments during the molting process that happen quickly, like when the cicada pulls its abdomen from its old skin. Having a video of that is nice.
- Be prepared to adjust the framing and focus a few times during the shoot. Don’t adjust too much though — just if the cicada’s wings fall out of frame.
- The cicada will double its overall size. Its wings will hang downward. Be prepared for that when you frame the shot.
Some results:
My latest time-lapse video:
Notice how I frame the video.
A non-time-lapse detail:
A video where I used a tree branch to make the molting look more natural
One reply on “Tips for making a time-lapse video of a cicada molting”
I grew up “in the country”.Watching this amazing thing for years & have always love to see all insects life cycles come to us (butterflies) locusts, then to different things like frogs. Alotta girls wouldn’t have any interest in this.But I had great teachers– father &brothers so now at 75yrs.old..video taped mine for 1st time…love it